برچسب: Gemini

  • Agentic AI takes Gemini in Android Studio to the next level


    Posted by Sandhya Mohan – Product Manager, and Jose Alcérreca – Developer Relations Engineer

    Software development is undergoing a significant evolution, moving beyond reactive assistants to intelligent agents. These agents don’t just offer suggestions; they can create execution plans, utilize external tools, and make complex, multi-file changes. This results in a more capable AI that can iteratively solve challenging problems, fundamentally changing how developers work.

    At Google I/O 2025, we offered a glimpse into our work on agentic AI in Android Studio, the integrated development environment (IDE) focused on Android development. We showcased that by combining agentic AI with the built-in portfolio of tools inside of Android Studio, the IDE is able to assist you in developing Android apps in ways that were never possible before. We are now incredibly excited to announce the next frontier in Android development with the availability of ‘Agent Mode’ for Gemini in Android Studio.

    These features are available in the latest Android Studio Narwhal Feature Drop Canary release, and will be rolled out to business tier subscribers in the coming days. As with all new Android Studio features, we invite developers to provide feedback to direct our development efforts and ensure we are creating the tools you need to build better apps, faster.

    Agent Mode

    Gemini in Android Studio’s Agent Mode is a new experimental capability designed to handle complex development tasks that go beyond what you can experience by just chatting with Gemini.

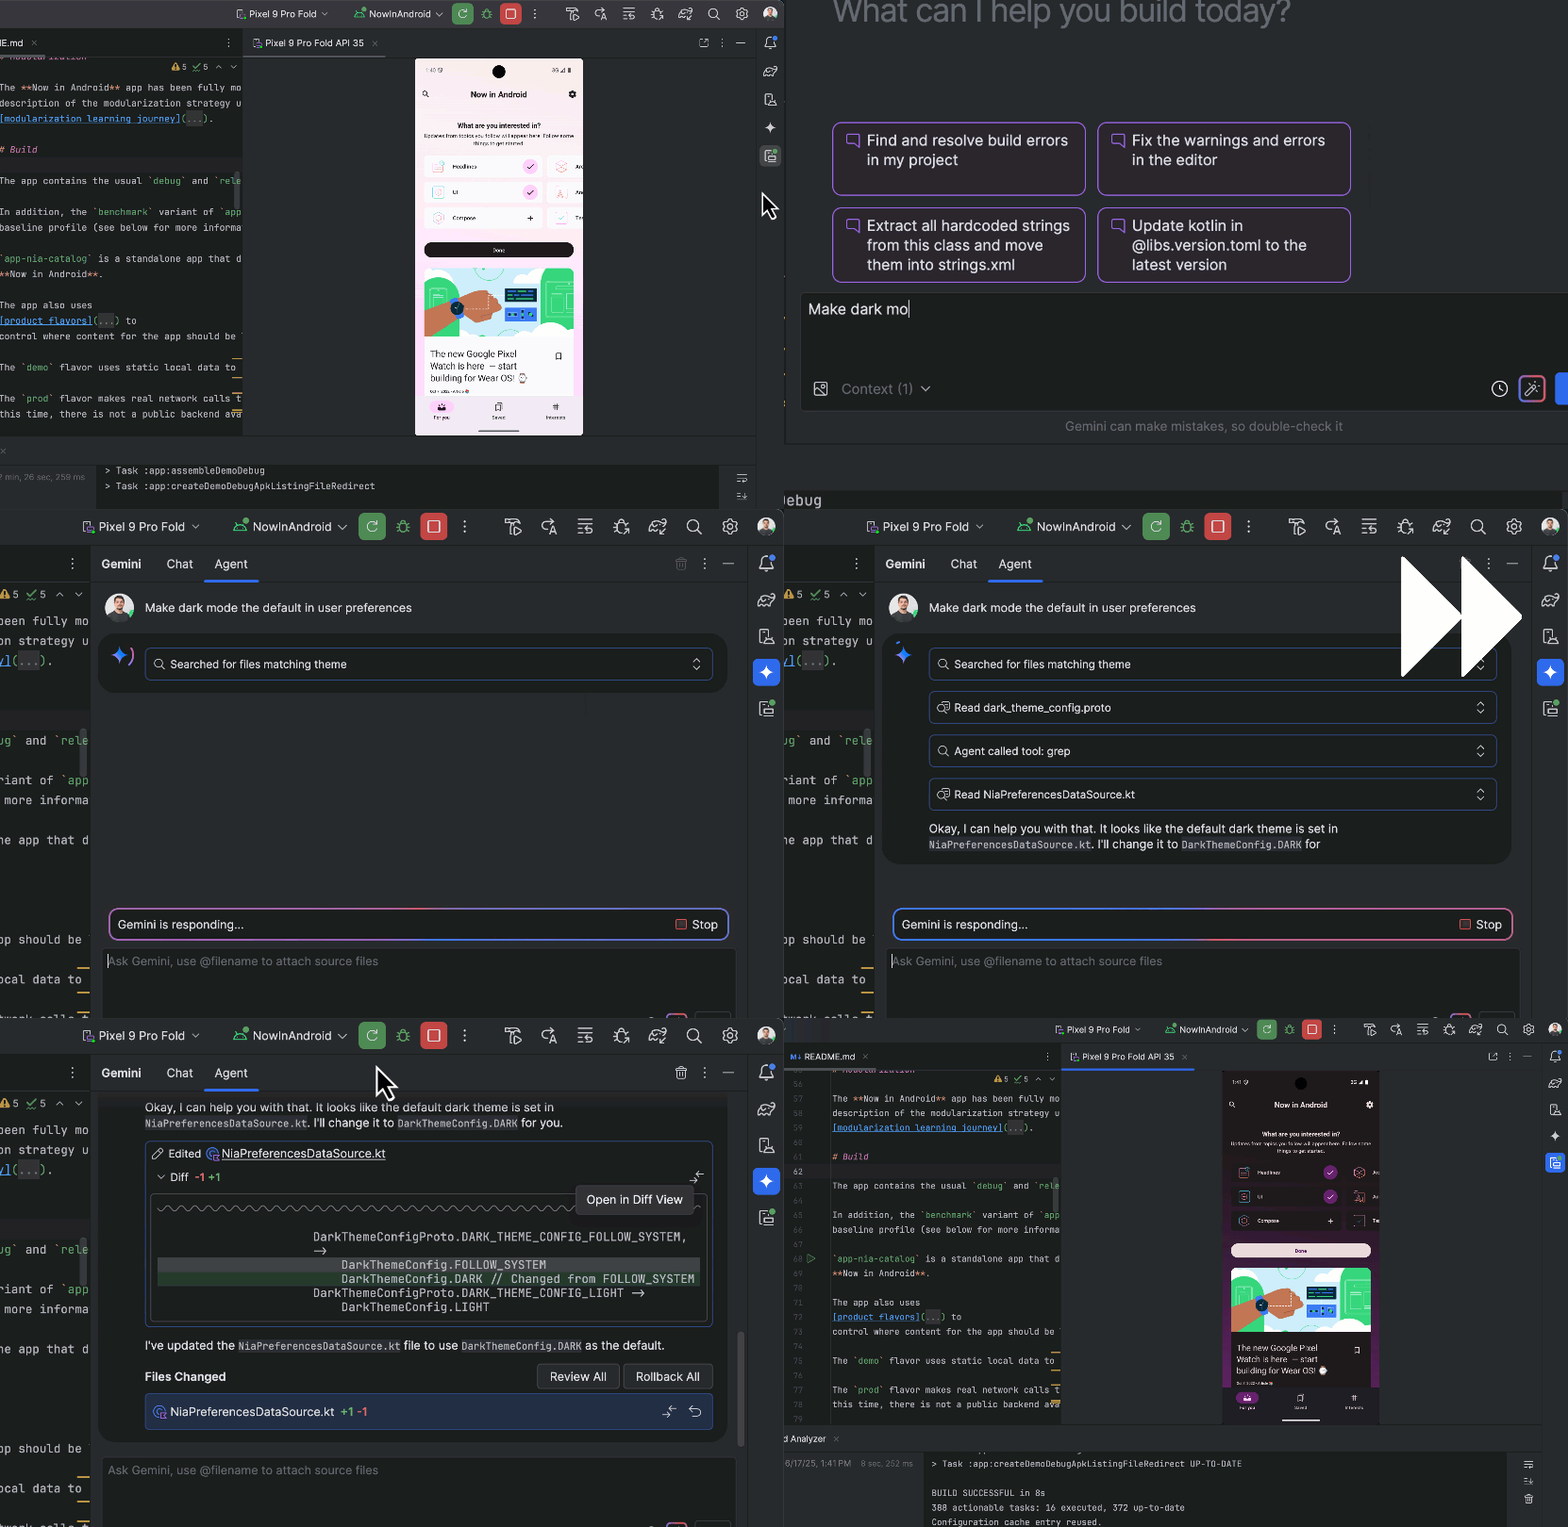
    With Agent Mode, you can describe a complex goal in natural language — from generating unit tests to complex refactors — and the agent formulates an execution plan that can span multiple files in your project and executes under your direction. Agent Mode uses a range of IDE tools for reading and modifying code, building the project, searching the codebase and more to help Gemini complete complex tasks from start to finish with minimal oversight from you.

    To use Agent Mode, click Gemini in the sidebar, then select the Agent tab, and describe a task you’d like the agent to perform. Some examples of tasks you can try in Agent Mode include:

      • Build my project and fix any errors
      • Extract any hardcoded strings used across my project and migrate to strings.xml
      • Add support for dark mode to my application
      • Given an attached screenshot, implement a new screen in my application using Material 3

    The agent then suggests edits and iteratively fixes bugs to complete tasks. You can review, accept, or reject the proposed changes along the way, and ask the agent to iterate on your feedback.
    moving image showing Gemini breaking tasks down into a plan with simple steps, and the list of IDE tools it needs to complete each step

    Gemini breaks tasks down into a plan with simple steps. It also shows the list of IDE tools it needs to complete each step.

    While powerful, you are firmly in control, with the ability to review, refine and guide the agent’s output at every step. When the agent proposes code changes, you can choose to accept or reject them.

    screenshot of Gemini in Android Studio showing the Agent prompting the user to accept or reject a change

    The Agent waits for the developer to approve or reject a change.

    Additionally, you can enable “Auto-approve” if you are feeling lucky 😎 — especially useful when you want to iterate on ideas as rapidly as possible.

    You can delegate routine, time-consuming work to the agent, freeing up your time for more creative, high-value work. Try out Agent Mode in the latest preview version of Android Studio – we look forward to seeing what you build! We are investing in building more agentic experiences for Gemini in Android Studio to make your development even more intuitive, so you can expect to see more agentic functionality over the next several releases.

    moving image showing that Gemini understanding the context of an app

    Gemini is capable of understanding the context of your app

    Supercharge Agent Mode with your Gemini API key

    screenshot of Gemini API key prompt in Android Studio

    The default Gemini model has a generous no-cost daily quota with a limited context window. However, you can now add your own Gemini API key to expand Agent Mode’s context window to a massive 1 million tokens with Gemini 2.5 Pro.

    A larger context window lets you send more instructions, code and attachments to Gemini, leading to even higher quality responses. This is especially useful when working with agents, as the larger context provides Gemini 2.5 Pro with the ability to reason about complex or long-running tasks.

    screenshot of how to add your API Key in the Gemini settings

    Add your API key in the Gemini settings

    To enable this feature, get a Gemini API key by navigating to Google AI Studio. Sign in and get a key by clicking on the “Get API key” button. Then, back in Android Studio, navigate to the settings by going to File (Android Studio on macOS) > Settings > Tools > Gemini to enter your Gemini API key. Relaunch Gemini in Android Studio and get even better responses from Agent Mode.

    Be sure to safeguard your Gemini API key, as additional charges apply for Gemini API usage associated with a personal API key. You can monitor your Gemini API key usage by navigating to AI Studio and selecting Get API key > Usage & Billing.

    Note that business tier subscribers already get access to Gemini 2.5 Pro and the expanded context window automatically with their Gemini Code Assist license, so these developers will not see an API key option.

    Model Context Protocol (MCP)

    Gemini in Android Studio’s Agent Mode can now interact with external tools via the Model Context Protocol (MCP). This feature provides a standardized way for Agent Mode to use tools and extend knowledge and capabilities with the external environment.

    There are many tools you can connect to the MCP Host in Android Studio. For example you could integrate with the Github MCP Server to create pull requests directly from Android Studio. Here are some additional use cases to consider.

    In this initial release of MCP support in the IDE you will configure your MCP servers through a mcp.json file placed in the configuration directory of Studio, using the following format:

    {
      "mcpServers": {
        "memory": {
          "command": "npx",
          "args": [
            "-y",
            "@modelcontextprotocol/server-memory"
          ]
        },
        "sequential-thinking": {
          "command": "npx",
          "args": [
            "-y",
            "@modelcontextprotocol/server-sequential-thinking"
          ]
        },
        "github": {
          "command": "docker",
          "args": [
            "run",
            "-i",
            "--rm",
            "-e",
            "GITHUB_PERSONAL_ACCESS_TOKEN",
            "ghcr.io/github/github-mcp-server"
          ],
          "env": {
            "GITHUB_PERSONAL_ACCESS_TOKEN": "<YOUR_TOKEN>"
          }
        }
      }  
    }
    
    Example configuration with two MCP servers

    For this initial release, we support interacting with external tools via the stdio transport as defined in the MCP specification. We plan to support the full suite of MCP features in upcoming Android Studio releases, including the Streamable HTTP transport, external context resources, and prompt templates.

    For more information on how to use MCP in Studio, including the mcp.json configuration file format, please refer to the Android Studio MCP Host documentation.

    By delegating routine tasks to Gemini through Agent Mode, you’ll be able to focus on more innovative and enjoyable aspects of app development. Download the latest preview version of Android Studio on the canary release channel today to try it out, and let us know how much faster app development is for you!

    As always, your feedback is important to us – check known issues, report bugs, suggest improvements, and be part of our vibrant community on LinkedIn, Medium, YouTube, or X. Let’s build the future of Android apps together!


    Source link

  • How Androidify leverages Gemini, Firebase and ML Kit


    Posted by Thomas Ezan – Developer Relations Engineer, Rebecca Franks – Developer Relations Engineer, and Avneet Singh – Product Manager

    We’re bringing back Androidify later this year, this time powered by Google AI, so you can customize your very own Android bot and share your creativity with the world. Today, we’re releasing a new open source demo app for Androidify as a great example of how Google is using its Gemini AI models to enhance app experiences.

    In this post, we’ll dive into how the Androidify app uses Gemini models and Imagen via the Firebase AI Logic SDK, and we’ll provide some insights learned along the way to help you incorporate Gemini and AI into your own projects. Read more about the Androidify demo app.

    App flow

    The overall app functions as follows, with various parts of it using Gemini and Firebase along the way:

    flow chart demonstrating Androidify app flow

    Gemini and image validation

    To get started with Androidify, take a photo or choose an image on your device. The app needs to make sure that the image you upload is suitable for creating an avatar.

    Gemini 2.5 Flash via Firebase helps with this by verifying that the image contains a person, that the person is in focus, and assessing image safety, including whether the image contains abusive content.

    val jsonSchema = Schema.obj(
       properties = mapOf("success" to Schema.boolean(), "error" to Schema.string()),
       optionalProperties = listOf("error"),
       )
       
    val generativeModel = Firebase.ai(backend = GenerativeBackend.googleAI())
       .generativeModel(
                modelName = "gemini-2.5-flash-preview-04-17",
       	     generationConfig = generationConfig {
                    responseMimeType = "application/json"
                    responseSchema = jsonSchema
                },
                safetySettings = listOf(
                    SafetySetting(HarmCategory.HARASSMENT, HarmBlockThreshold.LOW_AND_ABOVE),
                    SafetySetting(HarmCategory.HATE_SPEECH, HarmBlockThreshold.LOW_AND_ABOVE),
                    SafetySetting(HarmCategory.SEXUALLY_EXPLICIT, HarmBlockThreshold.LOW_AND_ABOVE),
                    SafetySetting(HarmCategory.DANGEROUS_CONTENT, HarmBlockThreshold.LOW_AND_ABOVE),
                    SafetySetting(HarmCategory.CIVIC_INTEGRITY, HarmBlockThreshold.LOW_AND_ABOVE),
        	),
        )
    
     val response = generativeModel.generateContent(
                content {
                    text("You are to analyze the provided image and determine if it is acceptable and appropriate based on specific criteria.... (more details see the full sample)")
                    image(image)
                },
            )
    
    val jsonResponse = Json.parseToJsonElement(response.text)
    val isSuccess = jsonResponse.jsonObject["success"]?.jsonPrimitive?.booleanOrNull == true
    val error = jsonResponse.jsonObject["error"]?.jsonPrimitive?.content
    

    In the snippet above, we’re leveraging structured output capabilities of the model by defining the schema of the response. We’re passing a Schema object via the responseSchema param in the generationConfig.

    We want to validate that the image has enough information to generate a nice Android avatar. So we ask the model to return a json object with success = true/false and an optional error message explaining why the image doesn’t have enough information.

    Structured output is a powerful feature enabling a smoother integration of LLMs to your app by controlling the format of their output, similar to an API response.

    Image captioning with Gemini Flash

    Once it’s established that the image contains sufficient information to generate an Android avatar, it is captioned using Gemini 2.5 Flash with structured output.

    val jsonSchema = Schema.obj(
                properties = mapOf(
                    "success" to Schema.boolean(),
                    "user_description" to Schema.string(),
                ),
                optionalProperties = listOf("user_description"),
            )
    val generativeModel = createGenerativeTextModel(jsonSchema)
    
    val prompt = "You are to create a VERY detailed description of the main person in the given image. This description will be translated into a prompt for a generative image model..."
    
    val response = generativeModel.generateContent(
    content { 
           	text(prompt) 
                 	image(image) 
    	})
            
    val jsonResponse = Json.parseToJsonElement(response.text!!) 
    val isSuccess = jsonResponse.jsonObject["success"]?.jsonPrimitive?.booleanOrNull == true
    
    val userDescription = jsonResponse.jsonObject["user_description"]?.jsonPrimitive?.content
    

    The other option in the app is to start with a text prompt. You can enter in details about your accessories, hairstyle, and clothing, and let Imagen be a bit more creative.

    Android generation via Imagen

    We’ll use this detailed description of your image to enrich the prompt used for image generation. We’ll add extra details around what we would like to generate and include the bot color selection as part of this too, including the skin tone selected by the user.

    val imagenPrompt = "A 3D rendered cartoonish Android mascot in a photorealistic style, the pose is relaxed and straightforward, facing directly forward [...] The bot looks as follows $userDescription [...]"
    

    We then call the Imagen model to create the bot. Using this new prompt, we create a model and call generateImages:

    // we supply our own fine-tuned model here but you can use "imagen-3.0-generate-002" 
    val generativeModel = Firebase.ai(backend = GenerativeBackend.googleAI()).imagenModel(
                "imagen-3.0-generate-002",
                safetySettings =
                ImagenSafetySettings(
                    ImagenSafetyFilterLevel.BLOCK_LOW_AND_ABOVE,
                    personFilterLevel = ImagenPersonFilterLevel.ALLOW_ALL,
                ),
    )
    
    val response = generativeModel.generateImages(imagenPrompt)
    
    val image = response.images.first().asBitmap()
    

    And that’s it! The Imagen model generates a bitmap that we can display on the user’s screen.

    Finetuning the Imagen model

    The Imagen 3 model was finetuned using Low-Rank Adaptation (LoRA). LoRA is a fine-tuning technique designed to reduce the computational burden of training large models. Instead of updating the entire model, LoRA adds smaller, trainable “adapters” that make small changes to the model’s performance. We ran a fine tuning pipeline on the Imagen 3 model generally available with Android bot assets of different color combinations and different assets for enhanced cuteness and fun. We generated text captions for the training images and the image-text pairs were used to finetune the model effectively.

    The current sample app uses a standard Imagen model, so the results may look a bit different from the visuals in this post. However, the app using the fine-tuned model and a custom version of Firebase AI Logic SDK was demoed at Google I/O. This app will be released later this year and we are also planning on adding support for fine-tuned models to Firebase AI Logic SDK later in the year.

    moving image of Androidify app demo turning a selfie image of a bearded man wearing a black tshirt and sunglasses, with a blue back pack into a green 3D bearded droid wearing a black tshirt and sunglasses with a blue backpack

    The original image… and Androidifi-ed image

    ML Kit

    The app also uses the ML Kit Pose Detection SDK to detect a person in the camera view, which triggers the capture button and adds visual indicators.

    To do this, we add the SDK to the app, and use PoseDetection.getClient(). Then, using the poseDetector, we look at the detectedLandmarks that are in the streaming image coming from the Camera, and we set the _uiState.detectedPose to true if a nose and shoulders are visible:

    private suspend fun runPoseDetection() {
        PoseDetection.getClient(
            PoseDetectorOptions.Builder()
                .setDetectorMode(PoseDetectorOptions.STREAM_MODE)
                .build(),
        ).use { poseDetector ->
            // Since image analysis is processed by ML Kit asynchronously in its own thread pool,
            // we can run this directly from the calling coroutine scope instead of pushing this
            // work to a background dispatcher.
            cameraImageAnalysisUseCase.analyze { imageProxy ->
                imageProxy.image?.let { image ->
                    val poseDetected = poseDetector.detectPersonInFrame(image, imageProxy.imageInfo)
                    _uiState.update { it.copy(detectedPose = poseDetected) }
                }
            }
        }
    }
    
    private suspend fun PoseDetector.detectPersonInFrame(
        image: Image,
        imageInfo: ImageInfo,
    ): Boolean {
        val results = process(InputImage.fromMediaImage(image, imageInfo.rotationDegrees)).await()
        val landmarkResults = results.allPoseLandmarks
        val detectedLandmarks = mutableListOf<Int>()
        for (landmark in landmarkResults) {
            if (landmark.inFrameLikelihood > 0.7) {
                detectedLandmarks.add(landmark.landmarkType)
            }
        }
    
        return detectedLandmarks.containsAll(
            listOf(PoseLandmark.NOSE, PoseLandmark.LEFT_SHOULDER, PoseLandmark.RIGHT_SHOULDER),
        )
    }
    

    moving image showing the camera shutter button activating when an orange droid figurine is held in the camera frame

    The camera shutter button is activated when a person (or a bot!) enters the frame.

    Get started with AI on Android

    The Androidify app makes an extensive use of the Gemini 2.5 Flash to validate the image and generate a detailed description used to generate the image. It also leverages the specifically fine-tuned Imagen 3 model to generate images of Android bots. Gemini and Imagen models are easily integrated into the app via the Firebase AI Logic SDK. In addition, ML Kit Pose Detection SDK controls the capture button, enabling it only when a person is present in front of the camera.

    To get started with AI on Android, go to the Gemini and Imagen documentation for Android.

    Explore this announcement and all Google I/O 2025 updates on io.google starting May 22.


    Source link

  • Building powerful AI-driven experiences with Jetpack Compose, Gemini and CameraX


    The Android bot is a beloved mascot for Android users and developers, with previous versions of the bot builder being very popular – we decided that this year we’d rebuild the bot maker from the ground up, using the latest technology backed by Gemini. Today we are releasing a new open source app, Androidify, for learning how to build powerful AI driven experiences on Android using the latest technologies such as Jetpack Compose, Gemini through Firebase, CameraX, and Navigation 3.

    Here’s an example of the app running on the device, showcasing converting a photo to an Android bot that represents my likeness:

    moving image showing the conversion of an image of a woman in a pink dress holding na umbrella into a 3D image of a droid bot wearing a pink dress holding an umbrella

    Under the hood

    The app combines a variety of different Google technologies, such as:

      • Gemini API – through Firebase AI Logic SDK, for accessing the underlying Imagen and Gemini models.
      • Jetpack Compose – for building the UI with delightful animations and making the app adapt to different screen sizes.
      • Navigation 3 – the latest navigation library for building up Navigation graphs with Compose.
      • CameraX Compose and Media3 Compose – for building up a custom camera with custom UI controls (rear camera support, zoom support, tap-to-focus) and playing the promotional video.

    This sample app is currently using a standard Imagen model, but we’ve been working on a fine-tuned model that’s trained specifically on all of the pieces that make the Android bot cute and fun; we’ll share that version later this year. In the meantime, don’t be surprised if the sample app puts out some interesting looking examples!

    How does the Androidify app work?

    The app leverages our best practices for Architecture, Testing, and UI to showcase a real world, modern AI application on device.

    Flow chart describing Androidify app flow

    Androidify app flow chart detailing how the app works with AI

    AI in Androidify with Gemini and ML Kit

    The Androidify app uses the Gemini models in a multitude of ways to enrich the app experience, all powered by the Firebase AI Logic SDK. The app uses Gemini 2.5 Flash and Imagen 3 under the hood:

      • Image validation: We ensure that the captured image contains sufficient information, such as a clearly focused person, and assessing for safety. This feature uses the multi-modal capabilities of Gemini API, by giving it a prompt and image at the same time:

    val response = generativeModel.generateContent(
       content {
           text(prompt)
           image(image)
       },
    )
    

      • Text prompt validation: If the user opts for text input instead of image, we use Gemini 2.5 Flash to ensure the text contains a sufficiently descriptive prompt to generate a bot.

      • Image captioning: Once we’re sure the image has enough information, we use Gemini 2.5 Flash to perform image captioning., We ask Gemini to be as descriptive as possible,focusing on the clothing and its colors.

      • “Help me write” feature: Similar to an “I’m feeling lucky” type feature, “Help me write” uses Gemini 2.5 Flash to create a random description of the clothing and hairstyle of a bot.

      • Image generation from the generated prompt: As the final step, Imagen generates the image, providing the prompt and the selected skin tone of the bot.

    The app also uses the ML Kit pose detection to detect a person in the viewfinder and enable the capture button when a person is detected, as well as adding fun indicators around the content to indicate detection.

    Explore more detailed information about AI usage in Androidify.

    Jetpack Compose

    The user interface of Androidify is built using Jetpack Compose, the modern UI toolkit that simplifies and accelerates UI development on Android.

    Delightful details with the UI

    The app uses Material 3 Expressive, the latest alpha release that makes your apps more premium, desirable, and engaging. It provides delightful bits of UI out-of-the-box, like new shapes, componentry, and using the MotionScheme variables wherever a motion spec is needed.

    MaterialShapes are used in various locations. These are a preset list of shapes that allow for easy morphing between each other—for example, the cute cookie shape for the camera capture button:

    Androidify app UI showing camera button

    Camera button with a MaterialShapes.Cookie9Sided shape

    Beyond using the standard Material components, Androidify also features custom composables and delightful transitions tailored to the specific needs of the app:

      • There are plenty of shared element transitions across the app—for example, a morphing shape shared element transition is performed between the “take a photo” button and the camera surface.

        moving example of expressive button shapes in slow motion

      • Custom enter transitions for the ResultsScreen with the usage of marquee modifiers.

        animated marquee example

      • Fun color splash animation as a transition between screens.

        moving image of a blue color splash transition between Androidify demo screens

      • Animating gradient buttons for the AI-powered actions.

        animated gradient button for AI powered actions example

    To learn more about the unique details of the UI, read Androidify: Building delightful UIs with Compose

    Adapting to different devices

    Androidify is designed to look great and function seamlessly across candy bar phones, foldables, and tablets. The general goal of developing adaptive apps is to avoid reimplementing the same app multiple times on each form factor by extracting out reusable composables, and leveraging APIs like WindowSizeClass to determine what kind of layout to display.

    a collage of different adaptive layouts for the Androidify app across small and large screens

    Various adaptive layouts in the app

    For Androidify, we only needed to leverage the width window size class. Combining this with different layout mechanisms, we were able to reuse or extend the composables to cater to the multitude of different device sizes and capabilities.

      • Responsive layouts: The CreationScreen demonstrates adaptive design. It uses helper functions like isAtLeastMedium() to detect window size categories and adjust its layout accordingly. On larger windows, the image/prompt area and color picker might sit side-by-side in a Row, while on smaller windows, the color picker is accessed via a ModalBottomSheet. This pattern, called “supporting pane”, highlights the supporting dependencies between the main content and the color picker.

      • Foldable support: The app actively checks for foldable device features. The camera screen uses WindowInfoTracker to get FoldingFeature information to adapt to different features by optimizing the layout for tabletop posture.

      • Rear display: Support for devices with multiple displays is included via the RearCameraUseCase, allowing for the device camera preview to be shown on the external screen when the device is unfolded (so the main content is usually displayed on the internal screen).

    Using window size classes, coupled with creating a custom @LargeScreensPreview annotation, helps achieve unique and useful UIs across the spectrum of device sizes and window sizes.

    CameraX and Media3 Compose

    To allow users to base their bots on photos, Androidify integrates CameraX, the Jetpack library that makes camera app development easier.

    The app uses a custom CameraLayout composable that supports the layout of the typical composables that a camera preview screen would include— for example, zoom buttons, a capture button, and a flip camera button. This layout adapts to different device sizes and more advanced use cases, like the tabletop mode and rear-camera display. For the actual rendering of the camera preview, it uses the new CameraXViewfinder that is part of the camerax-compose artifact.

    CameraLayout in Compose

    CameraLayout composable that takes care of different device configurations, such as table top mode

    CameraLayout in Compose

    CameraLayout composable that takes care of different device configurations, such as table top mode

    The app also integrates with Media3 APIs to load an instructional video for showing how to get the best bot from a prompt or image. Using the new media3-ui-compose artifact, we can easily add a VideoPlayer into the app:

    @Composable
    private fun VideoPlayer(modifier: Modifier = Modifier) {
        val context = LocalContext.current
        var player by remember { mutableStateOf<Player?>(null) }
        LifecycleStartEffect(Unit) {
            player = ExoPlayer.Builder(context).build().apply {
                setMediaItem(MediaItem.fromUri(Constants.PROMO_VIDEO))
                repeatMode = Player.REPEAT_MODE_ONE
                prepare()
            }
            onStopOrDispose {
                player?.release()
                player = null
            }
        }
        Box(
            modifier
                .background(MaterialTheme.colorScheme.surfaceContainerLowest),
        ) {
            player?.let { currentPlayer ->
                PlayerSurface(currentPlayer, surfaceType = SURFACE_TYPE_TEXTURE_VIEW)
            }
        }
    }
    

    Using the new onLayoutRectChanged modifier, we also listen for whether the composable is completely visible or not, and play or pause the video based on this information:

    var videoFullyOnScreen by remember { mutableStateOf(false) }     
    
    LaunchedEffect(videoFullyOnScreen) {
         if (videoFullyOnScreen) currentPlayer.play() else currentPlayer.pause()
    } 
    
    // We add this onto the player composable to determine if the video composable is visible, and mutate the videoFullyOnScreen variable, that then toggles the player state. 
    Modifier.onVisibilityChanged(
                    containerWidth = LocalView.current.width,
                    containerHeight = LocalView.current.height,
    ) { fullyVisible -> videoFullyOnScreen = fullyVisible }
    
    // A simple version of visibility changed detection
    fun Modifier.onVisibilityChanged(
        containerWidth: Int,
        containerHeight: Int,
        onChanged: (visible: Boolean) -> Unit,
    ) = this then Modifier.onLayoutRectChanged(100, 0) { layoutBounds ->
        onChanged(
            layoutBounds.boundsInRoot.top > 0 &&
                layoutBounds.boundsInRoot.bottom < containerHeight &&
                layoutBounds.boundsInRoot.left > 0 &&
                layoutBounds.boundsInRoot.right < containerWidth,
        )
    }
    

    Additionally, using rememberPlayPauseButtonState, we add on a layer on top of the player to offer a play/pause button on the video itself:

    val playPauseButtonState = rememberPlayPauseButtonState(currentPlayer)
                OutlinedIconButton(
                    onClick = playPauseButtonState::onClick,
                    enabled = playPauseButtonState.isEnabled,
                ) {
                    val icon =
                        if (playPauseButtonState.showPlay) R.drawable.play else R.drawable.pause
                    val contentDescription =
                        if (playPauseButtonState.showPlay) R.string.play else R.string.pause
                    Icon(
                        painterResource(icon),
                        stringResource(contentDescription),
                    )
                }
    

    Check out the code for more details on how CameraX and Media3 were used in Androidify.

    Navigation 3

    Screen transitions are handled using the new Jetpack Navigation 3 library androidx.navigation3. The MainNavigation composable defines the different destinations (Home, Camera, Creation, About) and displays the content associated with each destination using NavDisplay. You get full control over your back stack, and navigating to and from destinations is as simple as adding and removing items from a list.

    @Composable
    fun MainNavigation() {
       val backStack = rememberMutableStateListOf<NavigationRoute>(Home)
       NavDisplay(
           backStack = backStack,
           onBack = { backStack.removeLastOrNull() },
           entryProvider = entryProvider {
               entry<Home> { entry ->
                   HomeScreen(
                       onAboutClicked = {
                           backStack.add(About)
                       },
                   )
               }
               entry<Camera> {
                   CameraPreviewScreen(
                       onImageCaptured = { uri ->
                           backStack.add(Create(uri.toString()))
                       },
                   )
               }
               // etc
           },
       )
    }
    

    Notably, Navigation 3 exposes a new composition local, LocalNavAnimatedContentScope, to easily integrate your shared element transitions without needing to keep track of the scope yourself. By default, Navigation 3 also integrates with predictive back, providing delightful back experiences when navigating between screens, as seen in this prior shared element transition:

    CameraLayout in Compose

    Learn more about Jetpack Navigation 3, currently in alpha.

    Learn more

    By combining the declarative power of Jetpack Compose, the camera capabilities of CameraX, the intelligent features of Gemini, and thoughtful adaptive design, Androidify is a personalized avatar creation experience that feels right at home on any Android device. You can find the full code sample at github.com/android/androidify where you can see the app in action and be inspired to build your own AI-powered app experiences.

    Explore this announcement and all Google I/O 2025 updates on io.google starting May 22.


    Source link

  • On-device GenAI APIs as part of ML Kit help you easily build with Gemini Nano


    Posted by Caren Chang – Developer Relations Engineer, Chengji Yan – Software Engineer, Taj Darra – Product Manager

    We are excited to announce a set of on-device GenAI APIs, as part of ML Kit, to help you integrate Gemini Nano in your Android apps.

    To start, we are releasing 4 new APIs:

      • Summarization: to summarize articles and conversations
      • Proofreading: to polish short text
      • Rewriting: to reword text in different styles
      • Image Description: to provide short description for images

    Key benefits of GenAI APIs

    GenAI APIs are high level APIs that allow for easy integration, similar to existing ML Kit APIs. This means you can expect quality results out of the box without extra effort for prompt engineering or fine tuning for specific use cases.

    GenAI APIs run on-device and thus provide the following benefits:

      • Input, inference, and output data is processed locally
      • Functionality remains the same without reliable internet connection
      • No additional cost incurred for each API call

    To prevent misuse, we also added safety protection in various layers, including base model training, safety-aware LoRA fine-tuning, input and output classifiers and safety evaluations.

    How GenAI APIs are built

    There are 4 main components that make up each of the GenAI APIs.

    1. Gemini Nano is the base model, as the foundation shared by all APIs.
    2. Small API-specific LoRA adapter models are trained and deployed on top of the base model to further improve the quality for each API.
    3. Optimized inference parameters (e.g. prompt, temperature, topK, batch size) are tuned for each API to guide the model in returning the best results.
    4. An evaluation pipeline ensures quality in various datasets and attributes. This pipeline consists of: LLM raters, statistical metrics and human raters.

    Together, these components make up the high-level GenAI APIs that simplify the effort needed to integrate Gemini Nano in your Android app.

    Evaluating quality of GenAI APIs

    For each API, we formulate a benchmark score based on the evaluation pipeline mentioned above. This score is based on attributes specific to a task. For example, when evaluating the summarization task, one of the attributes we look at is “grounding” (ie: factual consistency of generated summary with source content).

    To provide out-of-box quality for GenAI APIs, we applied feature specific fine-tuning on top of the Gemini Nano base model. This resulted in an increase for the benchmark score of each API as shown below:

    Use case in English Gemini Nano Base Model ML Kit GenAI API
    Summarization 77.2 92.1
    Proofreading 84.3 90.2
    Rewriting 79.5 84.1
    Image Description 86.9 92.3

    In addition, this is a quick reference of how the APIs perform on a Pixel 9 Pro:

    Prefix Speed
    (input processing rate)
    Decode Speed
    (output generation rate)
    Text-to-text 510 tokens/second 11 tokens/second
    Image-to-text 510 tokens/second + 0.8 seconds for image encoding 11 tokens/second

    Sample usage

    This is an example of implementing the GenAI Summarization API to get a one-bullet summary of an article:

    val articleToSummarize = "We are excited to announce a set of on-device generative AI APIs..."
    
    // Define task with desired input and output format
    val summarizerOptions = SummarizerOptions.builder(context)
        .setInputType(InputType.ARTICLE)
        .setOutputType(OutputType.ONE_BULLET)
        .setLanguage(Language.ENGLISH)
        .build()
    val summarizer = Summarization.getClient(summarizerOptions)
    
    suspend fun prepareAndStartSummarization(context: Context) {
        // Check feature availability. Status will be one of the following: 
        // UNAVAILABLE, DOWNLOADABLE, DOWNLOADING, AVAILABLE
        val featureStatus = summarizer.checkFeatureStatus().await()
    
        if (featureStatus == FeatureStatus.DOWNLOADABLE) {
            // Download feature if necessary.
            // If downloadFeature is not called, the first inference request will 
            // also trigger the feature to be downloaded if it's not already
            // downloaded.
            summarizer.downloadFeature(object : DownloadCallback {
                override fun onDownloadStarted(bytesToDownload: Long) { }
    
                override fun onDownloadFailed(e: GenAiException) { }
    
                override fun onDownloadProgress(totalBytesDownloaded: Long) {}
    
                override fun onDownloadCompleted() {
                    startSummarizationRequest(articleToSummarize, summarizer)
                }
            })    
        } else if (featureStatus == FeatureStatus.DOWNLOADING) {
            // Inference request will automatically run once feature is      
            // downloaded.
            // If Gemini Nano is already downloaded on the device, the   
            // feature-specific LoRA adapter model will be downloaded very  
            // quickly. However, if Gemini Nano is not already downloaded, 
            // the download process may take longer.
            startSummarizationRequest(articleToSummarize, summarizer)
        } else if (featureStatus == FeatureStatus.AVAILABLE) {
            startSummarizationRequest(articleToSummarize, summarizer)
        } 
    }
    
    fun startSummarizationRequest(text: String, summarizer: Summarizer) {
        // Create task request  
        val summarizationRequest = SummarizationRequest.builder(text).build()
    
        // Start summarization request with streaming response
        summarizer.runInference(summarizationRequest) { newText -> 
            // Show new text in UI
        }
    
        // You can also get a non-streaming response from the request
        // val summarizationResult = summarizer.runInference(summarizationRequest)
        // val summary = summarizationResult.get().summary
    }
    
    // Be sure to release the resource when no longer needed
    // For example, on viewModel.onCleared() or activity.onDestroy()
    summarizer.close()
    

    For more examples of implementing the GenAI APIs, check out the official documentation and samples on GitHub:

    Use cases

    Here is some guidance on how to best use the current GenAI APIs:

    For Summarization, consider:

      • Conversation messages or transcripts that involve 2 or more users
      • Articles or documents less than 4000 tokens (or about 3000 English words). Using the first few paragraphs for summarization is usually good enough to capture the most important information.

    For Proofreading and Rewriting APIs, consider utilizing them during the content creation process for short content below 256 tokens to help with tasks such as:

      • Refining messages in a particular tone, such as more formal or more casual
      • Polishing personal notes for easier consumption later

    For the Image Description API, consider it for:

      • Generating titles of images
      • Generating metadata for image search
      • Utilizing descriptions of images in use cases where the images themselves cannot be displayed, such as within a list of chat messages
      • Generating alternative text to help visually impaired users better understand content as a whole

    GenAI API in production

    Envision is an app that verbalizes the visual world to help people who are blind or have low vision lead more independent lives. A common use case in the app is for users to take a picture to have a document read out loud. Utilizing the GenAI Summarization API, Envision is now able to get a concise summary of a captured document. This significantly enhances the user experience by allowing them to quickly grasp the main points of documents and determine if a more detailed reading is desired, saving them time and effort.

    side by side images of a mobile device showing a document on a table on the left, and the results of the scanned document on the right showing details providing the what, when, and where as written in the document

    Supported devices

    GenAI APIs are available on Android devices using optimized MediaTek Dimensity, Qualcomm Snapdragon, and Google Tensor platforms through AICore. For a comprehensive list of devices that support GenAI APIs, refer to our official documentation.

    Learn more

    Start implementing GenAI APIs in your Android apps today with guidance from our official documentation and samples on GitHub: AI Catalog GenAI API Samples with Compose, ML Kit GenAI APIs Quickstart.


    Source link

  • Google Plans to Roll Out Gemini A.I. Chatbot to Children Under 13

    Google Plans to Roll Out Gemini A.I. Chatbot to Children Under 13


    Google plans to roll out its Gemini artificial intelligence chatbot next week for children under 13 who have parent-managed Google accounts, as tech companies vie to attract young users with A.I. products.

    “Gemini Apps will soon be available for your child,” the company said in an email this week to the parent of an 8-year-old. “That means your child will be able to use Gemini” to ask questions, get homework help and make up stories.

    The chatbot will be available to children whose parents use Family Link, a Google service that enables families to set up Gmail and opt into services like YouTube for their child. To sign up for a child account, parents provide the tech company with personal data like their child’s name and birth date.

    Gemini has specific guardrails for younger users to hinder the chatbot from producing certain unsafe content, said Karl Ryan, a Google spokesman. When a child with a Family Link account uses Gemini, he added, the company will not use that data to train its A.I.

    Introducing Gemini for children could accelerate the use of chatbots among a vulnerable population as schools, colleges, companies and others grapple with the effects of popular generative A.I. technologies. Trained on huge amounts of data, these systems can produce humanlike text and realistic-looking images and videos.

    Google and other A.I. chatbot developers are locked in a fierce competition to capture young users. President Trump recently urged schools to adopt the tools for teaching and learning. Millions of teenagers are already using chatbots as study aids, writing coaches and virtual companions. Children’s groups warn the chatbots could pose serious risks to child safety. The bots also sometimes make stuff up.

    UNICEF, the United Nation’s children’s agency, and other children’s groups have noted that the A.I. systems could confuse, misinform and manipulate young children who may have difficulty understanding that the chatbots are not human.

    “Generative A.I. has produced dangerous content,” UNICEF’s global research office said in a post on A.I. risks and opportunities for children.

    Google acknowledged some risks in its email to families this week, alerting parents that “Gemini can make mistakes” and suggesting they “help your child think critically” about the chatbot.

    The email also recommended parents teach their child how to fact-check Gemini’s answers. And the company suggested parents remind their child that “Gemini isn’t human” and “not to enter sensitive or personal info in Gemini.”

    Despite the company’s efforts to filter inappropriate material, the email added, children “may encounter content you don’t want them to see.”

    A Google email to parents this week warned about the risks of Gemini for children.

    Over the years, tech giants have developed a variety of products, features and safeguards for teens and children. In 2015, Google introduced YouTube Kids, a stand-alone video app for children that is popular among families with toddlers.

    Other efforts to attract children online have prompted concerns from government officials and children’s advocates. In 2021, Meta halted plans to introduce an Instagram Kids service — a version of its Instagram app intended for those under the age of 13 — after the attorneys general of several dozen states sent a letter to the company saying the firm had “historically failed to protect the welfare of children on its platforms.”

    Some prominent tech companies — including Google, Amazon and Microsoft — have also paid multimillion-dollar fines to settle government complaints that they violated the Children’s Online Privacy Protection Act. That federal law requires online services aimed at children to obtain a parent’s permission before collecting personal information, like a home address or a selfie, from a child under 13.

    Under the Gemini rollout, children with family-managed Google accounts would initially be able to access the chatbot on their own. But the company said it would alert parents and that parents could then manage their child’s chatbot settings, “including turning access off.”

    “Your child will be able to access Gemini Apps soon,” the company’s email to parents said. “We’ll also let you know when your child accesses Gemini for the first time.”

    Mr. Ryan, the Google spokesman, said the approach to providing Gemini for young users complied with the federal children’s online privacy law.


    Source link

  • Multimodal image attachment is now available for Gemini in Android Studio


    Posted by Paris Hsu – Product Manager, Android Studio

    At every stage of the development lifecycle, Gemini in Android Studio has become your AI-powered companion, making it easier to build high quality apps. We are excited to announce a significant expansion: Gemini in Android Studio now supports multimodal inputs, which lets you attach images directly to your prompts! This unlocks a wealth of new possibilities that improve team collaboration and UI development workflows.

    You can try out this new feature by downloading the latest Android Studio canary. We’ve outlined a few use cases to try, but we’d love to hear what you think as we work through bringing this feature into future stable releases. Check it out:

    https://www.youtube.com/watch?v=f_6mtRWJzuc

    Image attachment – a new dimension of interaction

    We first previewed Gemini’s multimodal capabilities at Google I/O 2024. This technology allows Gemini in Android Studio to understand simple wireframes, and transform them into working Jetpack Compose code.

    You’ll now find an image attachment icon in the Gemini chat window. Simply attach JPEG or PNG files to your prompts and watch Gemini understand and respond to visual information. We’ve observed that images with strong color contrasts yield the best results.

    New “Attach Image File” icon in chat window

    1.1 New “Attach Image File” icon in chat window

    Example of multimodal response in chat

    1.2 Example multimodal response in chat

    We encourage you to experiment with various prompts and images. Here are a few compelling use cases to get you started:

      • Rapid UI prototyping and iteration: Convert a simple wireframe or high-fidelity mock of your app’s UI into working code.
      • Diagram explanation and documentation: Gain deeper insights into complex architecture or data flow diagrams by having Gemini explain their components and relationships.
      • UI troubleshooting: Capture screenshots of UI bugs and ask Gemini for solutions.

    Rapid UI prototyping and iteration

    Gemini’s multimodal support lets you convert visual designs into functional UI code. Simply upload your image and use a clear prompt. It works whether you’re working from your own sketches or from a designer mockup.

    Here’s an example prompt: “For this image provided, write Android Jetpack Compose code to make a screen that’s as close to this image as possible. Make sure to include imports, use Material3, and document the code.” And then you can append any specific or additional instructions related to the image.

    Example prompt: 'For this image provided, write Android Jetpack Compose code to make a screen that's as close to this image as possible. Make sure to include imports, use Material3, and document the code.'

    Example of generating Compose code from high-fidelity mock using Gemini in Android Studio

    2. Example of generating Compose code from high-fidelity mock using Gemini in Android Studio (code output)

    For more complex UIs, refine your prompts to capture specific functionality. For instance, when converting a calculator mockup, adding “make the interactions and calculations work as you’d expect” results in a fully functional calculator:

    Example prompt to convert a calculator mock up

    Example of generating Compose code from high-fidelity mock using Gemini in Android Studio

    3. Example of generating Compose code from wireframe via Gemini in Android Studio (code output)

    Note: this feature provides an initial design scaffold. It’s a good “first draft” and your edits and adjustments will be needed. Common refinements include ensuring correct drawable imports and importing icons. Consider the generated code a highly efficient starting point, accelerating your UI development workflow.

    Diagram explanation and documentation

    With Gemini’s multimodal capabilities, you can also try uploading an image of your diagram and ask for explanations or documentation.

    Example prompt: Upload the Now in Android architecture diagram and say “Explain the components and data flow in this diagram” or “Write documentation about this diagram”.

    Example of generating Compose code from high-fidelity mock using Gemini in Android Studio

    4. Example of asking Gemini to help document the NowInAndroid architecture diagram

    UI troubleshooting

    Leverage Gemini’s visual analysis to identify and resolve bugs quickly. Upload a screenshot of the problematic UI, and Gemini will analyze the image and suggest potential solutions. You can also include relevant code snippets for more precise assistance.

    In the example below, we used Compose UI check and found that the button is stretched too wide in tablet screens, so we took a screenshot and asked Gemini for solutions – it was able to leverage the window size classes to provide the right fix.

    Example of generating Compose code from high-fidelity mock using Gemini in Android Studio

    5. Example of fixing UI bugs using Image Attachment (code output)

    Download Android Studio today

    Download the latest Android Studio canary today to try the new multimodal features!

    As always, Google is committed to the responsible use of AI. Android Studio won’t send any of your source code to servers without your consent. You can read more on Gemini in Android Studio’s commitment to privacy.

    We appreciate any feedback on things you like or features you would like to see. If you find a bug, please report the issue and also check out known issues. Remember to also follow us on X, Medium, or YouTube for more Android development updates!


    Source link

  • Multimodal for Gemini in Android Studio, news for gaming devs, the latest devices at MWC, XR and more!


    Posted by Anirudh Dewani – Director, Android Developer Relations

    We just dropped our Winter episode of #TheAndroidShow, on YouTube and on developer.android.com, and this time we were in Barcelona to give you the latest from Mobile World Congress and across the Android Developer world. We unveiled a big update to Gemini in Android Studio (multi-modal support, so you can translate image to code) and we shared some news for games developers ahead of GDC later this month. Plus we unpacked the latest Android hardware devices from our partners coming out of Mobile World Congress and recapped all of the latest in Android XR. Let’s dive in!

    https://www.youtube.com/watch?v=-Drt3YeIMuc

    Multimodality image-to-code, now available for Gemini in Android Studio

    At every stage of the development lifecycle, Gemini in Android Studio has become your AI-powered companion. Today, we took the wraps off a new feature: Gemini in Android Studio now supports multimodal image to code, which lets you attach images directly to your prompts! This unlocks a wealth of new possibilities that improve collaboration and design workflows. You can try out this new feature by downloading the latest canary – Android Studio Narwal, and read more about multimodal image attachment – now available for Gemini in Android Studio.

    https://www.youtube.com/watch?v=f_6mtRWJzuc

    Building excellent games with better graphics and performance

    Ahead of next week’s Games Developer Conference (GDC), we announced new developer tools that will help improve gameplay across the Android ecosystem. We’re making Vulkan the official graphics API on Android, enabling you to build immersive visuals, and we’re enhancing the Android Dynamic Performance Framework (ADPF) to help you deliver longer, more stable gameplay sessions. Learn more about how we’re building excellent games with better graphics and performance.

    https://www.youtube.com/watch?v=SkkkwCEkO6I

    A deep dive into Android XR

    Since we unveiled Android XR in December, it’s been exciting to see developers preparing their apps for the next generation of Android XR devices. In the latest episode of #TheAndroidShow we dove into this new form factor and spoke with a developer who has already been building. Developing for this new platform leverages your existing Android development skills and familiar tools like Android Studio, Kotlin, and Jetpack libraries. The Android XR SDK Developer Preview is available now, complete with an emulator, so you can start experimenting and building XR experiences immediately! Visit developer.android.com/xr for more.

    https://www.youtube.com/watch?v=AkKjMtBYwDA

    New Android foldables and tablets, at Mobile World Congress

    Mobile World Congress is a big moment for Android, with partners from around the world showing off their latest devices. And if you’re already building adaptive apps, we wanted to share some of the cool new foldable and tablets that our partners released in Barcelona:

      • OPPO: OPPO launched their Find N5, their slim 8.93mm foldable with a 8.12” large screen – making it as compact or expansive as needed.
      • Xiaomi: Xiaomi debuted the Xiaomi Pad 7 series. Xiaomi Pad 7 provides a crystal-clear display and, with the productivity accessories, users get a desktop-like experience with the convenience of a tablet.
      • Lenovo: Lenovo showcased their Yoga Tab Plus, the latest powerful tablet from their lineup designed to empower creativity and productivity.

    These new devices are a great reason to build adaptive apps that scale across screen sizes and device types. Plus, Android 16 removes the ability for apps to restrict orientation and resizability at the platform level, so you’ll want to prepare. To help you get started, the Compose Material 3 adaptive library enables you to quickly and easily create layouts across all screen sizes while reducing the overall development cost.

    https://www.youtube.com/watch?v=KqkUQpsQ2QA

    Watch the Winter episode of #TheAndroidShow

    That’s a wrap on this quarter’s episode of #TheAndroidShow. A special thanks to our co-hosts for the Fall episode, Simona Milanović and Alejandra Stamato! You can watch the full show on YouTube and on developer.android.com/events/show.

    Have an idea for our next episode of #TheAndroidShow? It’s your conversation with the broader community, and we’d love to hear your ideas for our next quarterly episode – you can let us know on X or LinkedIn.


    Source link

  • Google Chat could soon get scheduled messages and Gemini

    Google Chat could soon get scheduled messages and Gemini


    Hangouts move to Google Chat 2

    Joe Hindy / Android Authority

    TL;DR

    • Google Chat could finally get the ability to schedule messages, saving users from opting for third-party workarounds.
    • Users will be able to set the exact date and time for message delivery, and even view all scheduled messages in one place.
    • Google is also bringing Gemini features to Google Chat, letting users use the AI digital assistant within conversations.

    Gmail comes preloaded on Android flagships, so it’s often the de facto email app for most people since it does the job quite well. Nestled within Gmail is Google Chat, another one of Google’s many messaging apps, but one that not as many people use daily. Google hasn’t forgotten about Google Chat, though, as it is working on the ability to schedule messages and even bring Gemini features to it.

    You’re reading an Authority Insights story on Android Authority. Discover Authority Insights for more exclusive reports, app teardowns, leaks, and in-depth tech coverage you won’t find anywhere else.

    An APK teardown helps predict features that may arrive on a service in the future based on work-in-progress code. However, it is possible that such predicted features may not make it to a public release.

    Scheduling messages within Google Chat

    Currently, there is no way to schedule a message within Google Chat. Users have to resort to third-party services as a workaround to schedule a message in the DM. Thankfully, in the Gmail app v2025.04.13 release, we spotted clues that indicate Google is adding a way to schedule messages to send to people.

    Code

    <string name="MSG_SCHEDULING_MENU_TITLE">Schedule message</string>
    <string name="MSG_SEE_ALL_SCHEDULED_MESSAGES_BUTTON_TEXT">See all scheduled messages</string>
    <string name="MSG_X_NUMBER_MORE_SCHEDULED_MESSAGES_GOING_TO_BE_SENT_TO">{COUNT}+ messages scheduled to be sent to {GROUP_NAME}.</string>
    <string name="MSG_X_NUMBER_OF_SCHEDULED_MESSAGES_GOING_TO_BE_SENT_TO">{COUNT} messages scheduled to be sent to {GROUP_NAME}.</string>
    <string name="MSG_ONE_MESSAGE_SCHEDULED_TO_BE_SENT_BEYOND_THIS_WEEK">Your message will be sent to {GROUP_NAME} on {MONTH_AND_DAY} at {TIME}.</string>
    <string name="MSG_ONE_MESSAGE_SCHEDULED_TO_BE_SENT_LATER_IN_THIS_WEEK">Your message will be sent to {GROUP_NAME} on {DAY_OF_WEEK} at {TIME}.</string>
    <string name="MSG_ONE_MESSAGE_SCHEDULED_TO_BE_SENT_TODAY">Your message will be sent to {GROUP_NAME} at {TIME}.</string>
    <string name="MSG_ONE_MESSAGE_SCHEDULED_TO_BE_SENT_TOMORROW">Your message will be sent to {GROUP_NAME} tomorrow at {TIME}.</string>

    As you can see from the strings, users will soon be able to schedule messages for a pre-defined time, day of the week, or specific date. There will be a dedicated section that will also allow users to see all the messages they have scheduled out already, making it easier to make any changes if needed. This ability to schedule messages will remove the need for third-party services to get the same functionality.

    Gemini features for Google Chat on mobile

    Beyond this, Google is also working on bringing Gemini features for Google Chat, which are already available on the web version.

    Code

    While using Gemini in Chat, you can use Gemini to summarize, list action items, or answer specific questions about a conversation you have open.

    We managed to activate the feature to give you an early look from within the Gmail mobile app:

    You will be able to access Gemini within the Google Chat tab in Gmail for Android by clicking on the Gemini icon in the header bar. Tapping on it will reveal a bottom sheet that has a few recommended actions. If these suggestions don’t work, you can type your prompt in the text box. Either way, Gemini will often suggest more follow-up prompts that users can fall back on to keep the conversation going with the AI until they are satisfied.

    You can already use Gemini in Chat on the web to summarize a conversation or file, generate a list of action items, or answer specific questions about that space or conversation. It’s fair to presume that this functionality will also make its way to the Gmail mobile app.

    Neither the ability to schedule messages nor Gemini in Chat on mobile is available to users right now. These features may or may not be coming in the future, but given their utility, we hope they do. We’ll keep you updated when we learn more.

    Got a tip? Talk to us! Email our staff at news@androidauthority.com. You can stay anonymous or get credit for the info, it’s your choice.


    Source link